Removal and installation of the upper and lower lining of the floor tunnel on a VAZ 2110 car. Tips before removing and reinstalling.

The pink dream of any car enthusiast: I unscrewed a couple of screws, poked with a screwdriver, screwed up and the car is in perfect order! An — no… sometimes it is necessary to disassemble several mechanical assemblies, unscrew and tighten a lot of screws and nuts in order to adjust, for example, the movement of the gearshift lever or the parking brake system.
Repairing breakdowns in the gearbox is not easy. It is a knot that is securely anchored in the vehicle floor and covered with a tunnel floor lining. To disassemble and repair this mechanism, you will first need to dismantle the upper and lower cladding, and then reinstall it. We disassembled it on a VAZ 2110 car. On other models, the procedure is similar.
Dismantling the upper and lower floor tunnel liners
First of all, it should be noted that the lining should be removed after cleaning the floor in the passenger compartment, then disconnect the "?" from the battery and follow the next steps.

1.Two fastening screws each on the right and left side of the floor tunnel lining. Unscrew them and remove both covers.

2. On the right side, a niche will open, in which there are the cigarette lighter pads and its illumination. Disconnect them. 3. The lining, which is located on the fascia, is removed by pressing its front section under the parking brake lever. Take it off too.

4. Remove the handle of the gear lever by pulling up.

5. The cover of the gearshift lever of the car is attached to the latches on each of the four sides. To remove it, squeeze each one with a screwdriver.

6. Now you can go to the cladding itself. Loosen the center fixing screw.
7. Fold back the front seat to raise the front edge. This will open access to the middle fastening of the cladding. Unscrew the screws on both sides of the cladding.

8. By sliding back, remove the upper tunnel lining. It is installed in the reverse order of removal.
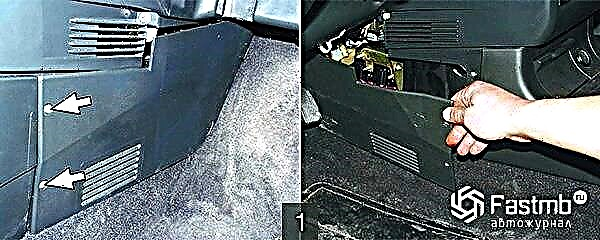
9. Move the seats forward. There are air outlets under them. They can be removed by unscrewing the fastening nuts.

10. The lower tunnel lining is secured with six nuts. Unscrew each and remove the cladding itself.
11. When the manipulations for the repair of the desired unit are made. It remains only to install the lower lining of the tunnel floor of the machine. This is done in the reverse order of dismantling.
Pay attention to the sockets of the air outlets: both must fit into the holes in the lower casing.
As you can see, there is nothing difficult in dismantling the floor tunnel lining. This event requires attention to detail and adherence to the order of actions.